meta name="p:domain_verify" content="83432fc69a1d6df071f49df584f9d839 Laurl Designs: DIY
Showing posts with label DIY. Show all posts

Tuesday, March 24, 2020

Suddenly Online Teaching- how to make an overhead document camera

Like most college educators, I have found myself suddenly online teaching. This series will hopefully help other educators, or new home office users, who have similarly found themselves in the same position, to be helpful.

Five quick tips!

1. Your IP address will change so each day that you log in with the second webcam, you will need to enter the new address. It is at the bottom of the camera screen.

2. You will need to make the same adjustments each time you log on. 

3. Do not spend time locating extra lighting, the system will auto-correct for lighting.

4. You do not need to have a SIM card in the phone if you have it connected to your wifi.

5. This is fiddly, just know that going in and be prepared to fiddle. Get it together before class "starts."


The back story:

As an interior design instructor, I need to demo drawing techniques live so that I can answer questions or repeat a technique again. Thus, I needed an overhead camera than integrated with my laptop so that I could "share my screen." I do not have a separate webcam from my laptop, nor did I want to burden my college when they have so many irons in the fire with everyone all of the suddenly teaching online.

So, I had to get creative.

 The idea:

I thought that I could just plug in my cellphone and use the camera, but my iPhone and Surface Pro do not talk to each other. So, I looked on the web for a solution (article from here) and it was to take an old cell phone that is the same type of operating system as the laptop. On a quest for an old phone at home, I found my 7-10-year-old android cell phone. It still charged up and I had a cable.

I was cooking!

The plan: 

You will need to get the cell phone camera to broadcast on your laptop and from a height above the workspace.

I installed IP Webcam for Android app on my phone and followed the online instructions to create the linkage (found here). Then, I entered my IP address from the phone in my browser. The web address can be found at the bottom of the cell phone screen when the app is running.

And magically on my computer screen came the image on the camera. I couldn't be more proud of myself. But that was only half the solution. I still needed to get in to float over my work table.


The equipment:

cellphone
charging cable
something for height above the table surface

When I hatched the plan to do this about a week ago, I ordered a "selfie ring with camera holder" from Amazon. The key to this product was that all the parts articulated so that I could set the height and turn the phone holder parallel to the tabletop.

This allows me to have an effective, though rather crude overhead camera that connects to my laptop that I can demo live drawing techniques with my student through screen sharing.

So, what if you do not have a selfie ring? You can still float the camera above the table with a different method. You might have a camera tripod with a cellphone holder. You could use a lightweight table or child's chair to attach the cell phone to and place the table above the surface. The IP webcam app will zoom the image for you, so distance is not as important as you might think.

If you have one of those new "C-tables", that would work very well because you can snuggle the table closer to the drawing surface. The one to right is from West Elm (found here). With this table, you could simply lay your phone on the table with the camera over the end and pointed down!

Because my cell phone is an old gal, I need to keep it plugged in and charging. So for me, the charging cord is a must. But if your phone holds a better charge, you will not need to do this.

Now, I am able to DUAL webcam with the zoom meeting. One camera of my face on the laptop camera and one that I can flip to on the laptop that allows me to "share my screen" and see the drawings. 

I hope you and your family are well, your students are happy and staying away from people and that you teaching is superb!

Please check out my other Suddenly Online Teaching series for more ideas coming this week.

Monday, January 26, 2015

Cleaning antique paper, archivally

Every once and while you run across a problem that takes special knowledge... knowledge that you should pay someone big bucks for, but you can only invest little bucks. I ran across one of those problems last month. I found a pair of lovely, hand-painted etching of fish from the late 1700's. They were part of a famous book (Allgemeine Naturgeschichte Der Fische by Block)  and had been removed- heart breaking to remove pages from a book, but that's another story.


These are beautiful and the one at the right even has a silver wash over it to create the iridescence of the fish. However, they were dirty, like dusty-type dirty, not actually soiled. I needed to have them cleaned, in an archival way, and my best bet was to drive over 2 hours to Atlanta and visit a paper restorer- BIG bucks.

But it was just the dirt I wanted to really remove, I could let the light water damage to the corner and a foxing spot stay. When I mentioned to a local framer that surely I could do a little research and do it myself he said, "could you read a book on baseball and throw a no hitter game?" Thanks Snarky Snarkington. It was then that I remembered why I do not use him very often to frame art.


Turns out there is very little on the web about cleaning antique paper. However, I know enough as a former librarian and trained artist, that there are accessible techniques.  I remember products for removing dirt, cleaning book covers, repairing paper, etc. from archival library supply websites and finally found it. It is called a Dry Cleaning Sponge- note that it is for cleaning dryly, not a product from the dry cleaning industry.

These "sponges" are actually vulcanized rubber foam, cut into squares. Vulcanization is a chemical process that turns goopy rubber into firm or hard rubber.


To use the sponge to clean/restore paper, simple lay the sponge on the paper and pull it across- with the grain and using little to no pressure. Turn the sponge to a clean spot on the sponge and do it again. Avoid any pencil marks that you do not want to erase. Start with the edge of the paper to test the process. Do the important parts last and sparingly.


When your sponge is dirty, clean with soap and water, let dry, and then you can use it again. I bought a twin pack so I could complete a project at one time.


Wednesday, May 7, 2014

Painted Chandelier- sprayed to coordinate DIY

The latest issue of Country Living features a home with the very hot trend of blue and white. In the bedroom, designer Emily Henderson sprayed a floral chandelier to a solid blue which completely updated the look of the piece. I would not recommend doing this to a chandelier of any value, or one who's fortune could change. But, a chipping, dented, chandelier that might have a bit of rust, perfect!  And, I have a collection of chandeliers for you to choose from, all are available from Hanna Antiques at a reasonable price!

Note the "bright idea" from Country Living May 2014

Now, DIY it! Good spray paint, something to hang it from outside, and some paper covering the candles and sockets and you are ready to go!

Here are some lamps for you to head over to Hanna's and pick up for your project.


I think all of these are under $200 many closer to $100! Head down to Hanna's and in the words of Jack Horkhiemer "keep looking up!"


Thursday, April 10, 2014

DIY Bar Cart! From Mid-Century Modern table to Mad Men-tastic bar cart

I love the look of those two tier mid-century side tables, however they are too low to function with modern furniture. So, I choose to remake one into a bar cart because I love the idea of the two levels, one for storage of bar items and one for glasses and mixing. And since you know how much I was in love with the Russian Figure ladies skater's costume as evident of my post on inspiring images in that color palette, I choose to use dark grey and bronze.


The key to the table is getting the right height and scale. The mixing surface was moved up to 26 inch high and the storage is about 34 inches high. This cart is styled for mixing alcoholic drinks, but would be super cute as a coffee bar, tea cart, or even as a small desk! I plan to use it for coffee.


This is a simple project of cutting off the legs, adding a little lumber, and a nice paint job. The nice paint job includes using a pattern. I have included the pattern at the bottom. You can enlarge it to the size you need! The instructions can be printed with the title of the project at the top.


SUPPLIES:
For this project you will need the following supplies to complete a table similar this one.

BASICS:
A table to alter- if using a table like this pick your cutting zone carefully and with consideration to the size of your lumber! I chose a spot that was not tapered to make adding the legs back easier.
lumber- I used 2"x 2" which is nominal measurement of 1.5" x 1.5". This scale worked for my project.
8 dowel screws
wood putty
paint
liquid sanding/ deglosser- I clean the table with this type product for better paint adhesion
Hack saw
drill and drill bits
locking pliers- plain pliers might work, but locking pliers make the work easier
pencil
ruler
straight-edge

EXTRAS:
tracing paper
gold paint
circular saw
painters tape


Leaf pattern for the top of the table.


Friday, March 28, 2014

Humidity woes. My new passive humidifer

Though I live in a region known for it's humidity, it is Static City in the Winter. And, I have begun to suspect that my dog need more humidity in the winter, like I do. Though thankfully, my aversion to dry air does not manifest as tummy troubles, as his does. 
So, when my 3 month old humidifier stopped working this week. I was in trouble, and needed a better fix that constantly boiling water on the stove. So, I put my thinking cap on and figured out a passive humidifier. One that is easy, most people have everything you need, and takes very little to maintain. 

It is the Air Vent Passive Humidifer... or there might be a better name.


You will need:
a rack of some sort, I choose a metal file sorter.
an absorbent fabric, I choose a linen napkin.


Thoroughly wet your fabric napkin and wring it out to prevent dripping. 

Place the metal file sorter, or your chosen rack over the heat vents in your home.

Place the fabric over the metal file sorter and walk away. That's it! Check it in a couple of hours to see if you need to re-wet. It does not look classy, but it works, at least until the new one arrives.

~: TIPS :~
Wool can hold about 30% of it's weight in water, so if you need to get away with longer than 2 hours, try using wool.

Drying your linens in the home, not in the dryer, is a great option for adding humidity into the home. And, it will save electricity. Towels, sheets, and tablecloths can hang on a clothes drying rack and quickly add humidity to a space. For faster results, place the rack over a heat vent or near the radiator.

Thursday, September 19, 2013

Fall pumpkins from recycled books

I love what people do with used and unwanted books. I played around with the idea of the pumpkin made from a book. And added my own methods and look.

It is perfect for Halloween, as well as Thanksgiving. I love a season craft that bridges two holidays.


I started with used books from the free bin in front of a local used book store.


My requirements included lots of pages, clean pages, and a good spine.


First I cut off the covers and spines... these maybe a future kindle covers! Then I began carving the pumpkins shape (half a pumpkin, actually) with an x-acto knife. A knife is easier than using scissors.


HINT: use the bottom of the book edge for the bottom of the pumpkin to add stability and save some cutting time.


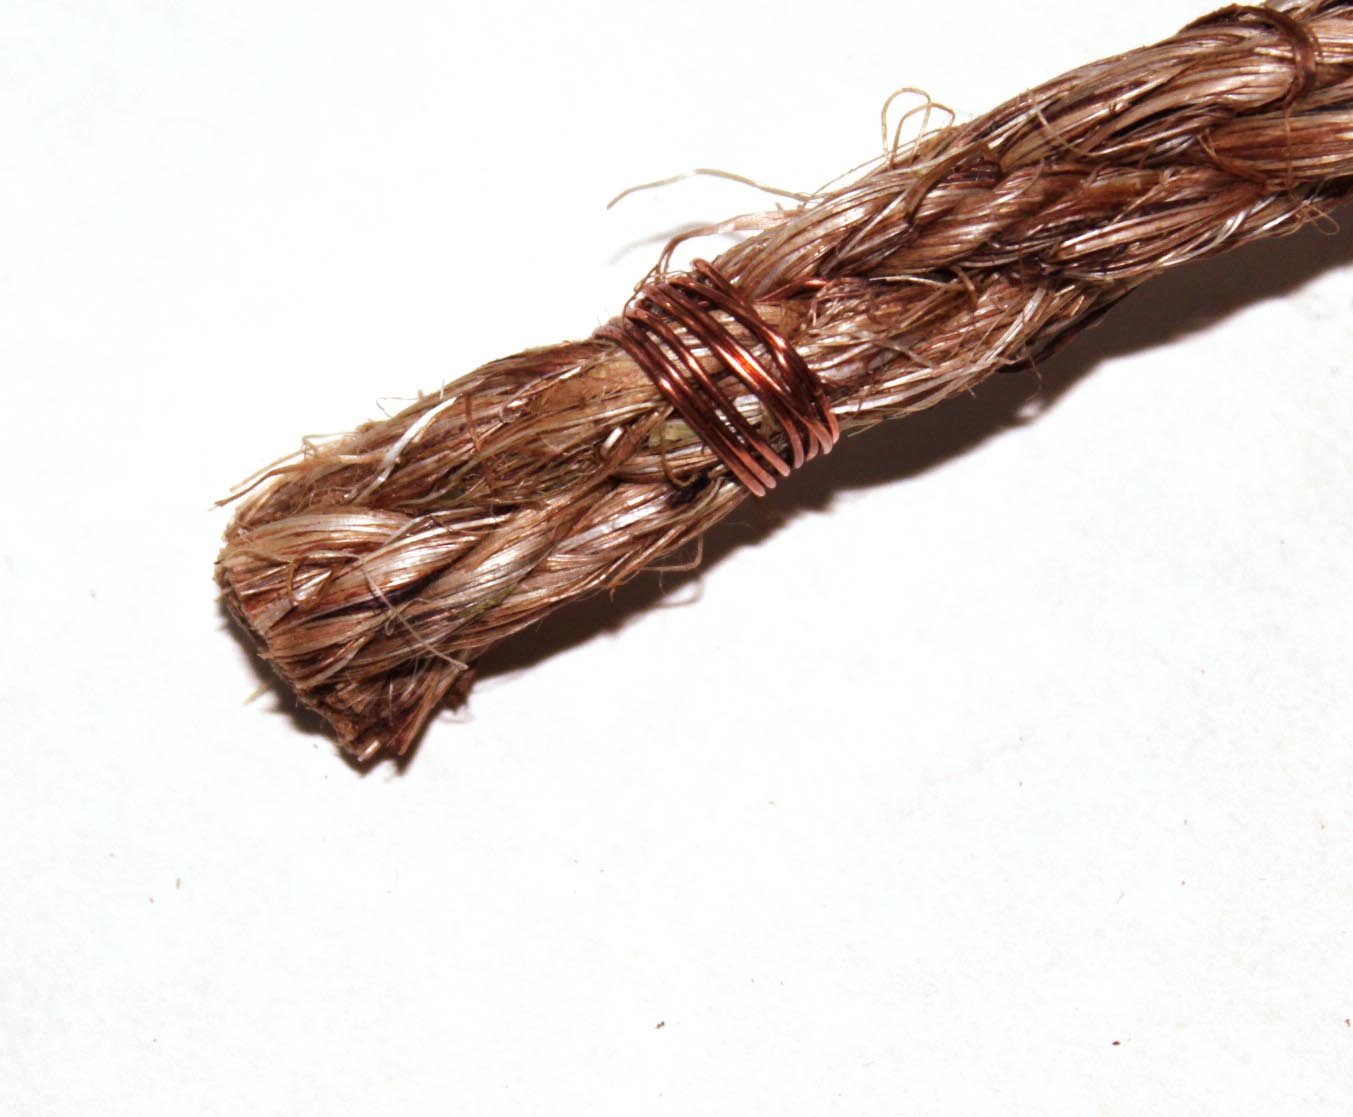
Then I cut jute rope to a length that went the length of the spine. One end is hot glued, the other is wire- wrapped. The wire-wrapped end is the "view" end. The other end goes in the center of the pumpkin.


Next, using hot glue, attach the rope to the center of the spine and glue the book all the way around the rope. Then flex the book pages to make the page spaces as even as possible.


Lastly, I choose to add seam binding loops and Spanish moss at the top.


Cute, cute, cute and easy to make with, most likely, things you have around the house!

Sunday, September 8, 2013

Ice dying- time for a class project

Fabric dying, for me, is as magical as Raku pottery to me and I can do in at home...

I am excited to announce a new venture with Do-It-Yourself Crafts in Homewood where I will be teaching classes in dying and felting! They will be super fun, perfect for making holiday gifts, and centrally located with many options for classes and class times!

My first class will be following the hot trend of infinity scarves combined with ice dying. This fast paced class will take you from a plain rayon jersey infinity scarf to one full of your favorite color!  Take the class to try it out, them com back for an "open" session where you can do multiples.

Here's my photos of  the ice-dying project you will be making. Of course you can pick your own color palette.

once the ice melts the dying is done and the waiting begins!

what I love about the process is the unexpected nature of it. This scarf is made using purple, turquoise and lime green. Due to the variations in the dye components, other unexpected and lovely colors can erupt! The golden yellow is unexpected, but lovely, nonetheless! 


The info on signing up for one of my classes... or all of them!

The Schedule: 

Monday September 16 10 a.m. Beginning Ice Dying - Circular Scarf $45
Wednesday September 18 10 a.m. Basic Nuno Felting - long silk scarf $54
Monday September 23 6:30 p.m. Beginning Ice Dying - Circular Scarf $45
Wednesday September 25 6:30 p.m. Basic Nuno Felting - long silk scarf $54
Saturday September 28 10 a.m. Felted Soap Creations - for KIDS aged 10 and older! $12 first bar, $10 each additional bar
Monday September 30 6:30 p.m. Advanced Ice Dying - several choices of items (will be explained at beginning class)
Wednesday October 2 6:00 Free Form Felting - $72 
Wednesday October 9 4 p.m. OPEN STUDIO FELTING AND DYING Price will vary by garment, some beginning class will need to have been taken!
Friday October 11 10 a.m. Nuno Felting and Dying $70


The classes will  be held at Do-It-Yourself Craft

1909 Oxmoor Road
Homewood, Alabama 35209

Phone: 205-868-4346
Hours: Monday thru Saturday 10am-6pm
Sunday 12-5pm 

Sunday, August 25, 2013

My Lemon Fig jam- where happy accidents and delicious meets


The first time I made Fig jam, or maybe it was called preserves, I could not decide if "1 slice lemon" was "1 slice of lemon" or "1 sliced lemon." I like lemon, so I sliced a lemon thinly and added it.


I realized at the end of the recipe, when you were to discard the slice, that they intended a much smaller amount of lemon. However, that was some delicious jam- sweet, lemony, and fig-licious.


Since that first recipe, I have continued to add lemon... a whole lemon diced.

I am not a canner who likes to make 8 quarts of anything at one time.

Too much pressure to eat it all and too much produce to acquire.

Beside, I like to have a variety of condiments so I small batch and cut down or alter recipes to make smaller quantities.


If you like to make 8 quarts, you are welcome to enlarge the recipe.

On to the recipe!


My happy accident Lemon Fig Jam


1 to 2 cup sugar (depends on how sweet you like it)
2 pounds figs
2 lemons


Remove stems from the figs and cut each one in 4-6 pieces.

Slice lemons, removing seeds, and dice in about 1/2 inch pieces or smaller.

Makes about one pint (I use two half pint jars)


 Add figs, lemons and sugar to and enameled pan and cook for 2-3 hours.


The jam should be thick, but will thicken more when cooled.

And even more after sitting a spell in the fridge!


While the jam is cooking, sterilize the canning jar, in the sterilizing cycle of the dishwasher, or fill you largest pan 2/3 full of water, bring to a boil and add the jars to the water to completely submerge for 5 minutes. Remove with tongs to a clean towel to rest and cool. Add canning rings to the boiling water to sterilize as well. In a small pan of boiling water, add the canning jar lids and leave on a low simmer.


I do not truly can these with a full on water bath, I store them in the refrigerator. However, when you store food for an extended length of time, you should sterilize your jars for safety.


Lastly... and this is the really hard part... you need to wait a week before you start enjoying you new jam. The lemon makes it a bit bitter (think strong orange marmalade- like maybe Dundee brand), after a week they will mellow considerably. Typically, I have a little left over that I can enjoy in the mean time. I like the bitterness of the lemon and enjoy it equally after a week or so.

If you do not like bitter, just use your microplane and jest the lemons, then peel off the white pith (where the
 bitter flavor is) and chop the lemon pulp.

Sunday, August 11, 2013

I'll let you in on a secret...

So, I love secret pin boards on Pinterest. It is where I store all the great ideas that I want to interpret into my own style. I am working on my Halloween shop design, as I type, and I thought I would share a couple of ideas I plan to interpret in my shop in Interiors and Antiques in Vestavia Hills.

The first comes from Sagebrush Ridge and is a pumpkin from a book. I am interpreting into different shaped pumpkins and I think I will be doing silver wood stems and silver pages with silver vintage German glitter.


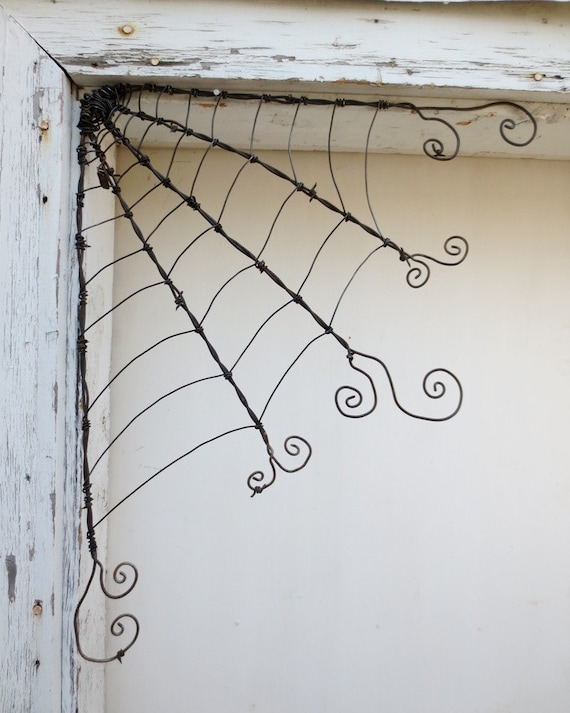
This item is actually for sale on Etsy from The Dusty Raven, love the shop name. I love the concept of the corner spider web. I'm thinking silver, not barbed wire,  less Tim Burton-ish and probably a wire spider that hangs low from the web.

18" Odd Twisted Barbed Wire Corner Spider Web Reclaimed Art

A few years ago, when I was a corporate librarian, I decorated a library space for Halloween with waves of bats circling the main reading room. The image below reminded me of that space. (It is actually Martha Stewart's bat mobile) I will definitely be doing the walls in wave of bats in the shop. I'm thinking the look will be like the Bat Cave in the Devil's Sinkhole State Natural in Texas where the bats emerge from at dusk most of the year.

bat-mobile-005-md109033.jpg

What are you storing, secretly, on Pinterest?